A


Fragment represents a portion of a user interface or an operation that runs within an Activity. A single activity can contain multiple fragments and many fragments can be reused in many, different activities. It is not wrong if we say that a fragment is a type of sub-activity that can be utilized again in multiple activities. Although each fragment has each own lifecycle, it is connected with the Activity it belongs to, so it’s lifecycle is directly influenced by the activity’s lifecycle. The main advantage of using fragments is due to the convenience of reusing the components in different layouts. In this tutorial, we are going to create our own fragments, where each one will be used when the user presses the appropriate button.1. Create the layout of the Main Activity
For this example, we need two different
Buttons. When a button is pressed, a fragment appears below them. So we will create two different buttons within the main LinearLayout and a fragment by using the <fragment> tag.
Open
res/layout/activity_main.xml and go to the “activity_main.xml” tab. Then paste the following code.
activity_main.xml:
<?xml version="1.0" encoding="utf-8"?> |
02 | <LinearLayout xmlns:android="http://schemas.android.com/apk/res/android" |
03 | android:layout_width="match_parent" |
04 | android:layout_height="match_parent" |
05 | android:orientation="vertical" > |
06 | <Button |
07 | android:id="@+id/button1" |
08 | android:layout_width="fill_parent" |
09 | android:layout_height="wrap_content" |
10 | android:text="Fragment No.1" |
11 | android:onClick="selectFrag" /> |
12 |
13 | <Button |
14 | android:id="@+id/button2" |
15 | android:layout_width="fill_parent" |
16 | android:layout_height="wrap_content" |
17 | android:onClick="selectFrag" |
18 | android:text="Fragment No.2" /> |
19 |
20 | <fragment |
21 | android:name="com.javacodegeeks.android.fragmentstest.FragmentOne" |
22 | android:id="@+id/fragment_place" |
23 | android:layout_width="match_parent" |
24 | android:layout_height="match_parent" /> |
25 | |
26 | </LinearLayout> |
Please, notice the highlighted lines. When we add a
We will use the
<fragment> element in a layout, we have to contain the android:name andandroid:id attributes. The android:name defines an object of a Fragment Class, that we want to be instantiated and theandroid:id specifies the unique id of that fragment.We will use the
FragmentOne as default.3. Create the Fragments
We are going to make two different classes to define the fragments, that extends the
Fragment Class.
Right click on
To the opened window, specify the name for the new Class. We will name it
com.javacodegeeks.android.filtertstest package → New → Class.To the opened window, specify the name for the new Class. We will name it
FragmentOne and we will put it in the same package as theMainActivity.java file.
Open
src/com.javacodegeeks.android.filtertstest/FragmentOne.java and paste the following.
FragmentOne.java:
01 | package com.javacodegeeks.android.fragmentstest; |
02 |
03 | import android.app.Fragment; |
04 | import android.os.Build; |
05 | import android.os.Bundle; |
06 | import android.view.LayoutInflater; |
07 | import android.view.View; |
08 | import android.view.ViewGroup; |
09 |
10 | public class FragmentOne extends Fragment { |
11 | @Override |
12 | public View onCreateView(LayoutInflater inflater, |
13 | ViewGroup container, Bundle savedInstanceState) { |
14 | |
15 | //Inflate the layout for this fragment |
16 | |
17 | return inflater.inflate( |
18 | R.layout.fragment_one, container, false); |
19 | } |
20 | } |
With the same way, we create the second fragment.
Right click on
Specify the name for the new Class. We will name it
com.javacodegeeks.android.filtertstest package → New → Class.Specify the name for the new Class. We will name it
FragmentTwo and we will put it in the same package as the FragmentOne.java file.
Open
src/com.javacodegeeks.android.filtertstest/FragmentTwo.java and paste the following.
FragmentTwo.java:
01 | package com.javacodegeeks.android.fragmentstest; |
02 |
03 | import android.app.Fragment; |
04 | import android.os.Build; |
05 | import android.os.Bundle; |
06 | import android.view.LayoutInflater; |
07 | import android.view.View; |
08 | import android.view.ViewGroup; |
09 |
10 |
11 | public class FragmentTwo extends Fragment{ |
12 | @Override |
13 | public View onCreateView(LayoutInflater inflater, |
14 | ViewGroup container, Bundle savedInstanceState) { |
15 | |
16 | // Inflate the layout for this fragment |
17 | |
18 | return inflater.inflate( |
19 | R.layout.fragment_two, container, false); |
20 | } |
21 | } |
As you can see in the code above, we use the
onCreateView override method. It is called by the Android system so that the fragment creates it’s user interface. Then, it returns a View component which is placed in the <fragment> element of the layout. That’s the reason we use the inflate method, in order to inflate a layout of an xml file and to return it’s view.4. Create the layouts of the Fragments
We are going to make a simple UI for each fragment layout, so we are going to create two different xml files.
For
For
FragmentOne we will create the fragment_one layout and for FragmentTwo the fragment_two respectively.
Right click on
res/layout folder → New → Android XML File and name the xml file. Choose the LinearLayout as root element, as shown in the picture below, and then press Finish.
Open the
res/layout/frament_one.xml file on the “fragment_one.xml” tab and paste the following code.
fragment_one.xml:
01 | <?xml version="1.0" encoding="utf-8"?> |
02 | <LinearLayout |
03 | xmlns:android="http://schemas.android.com/apk/res/android" |
04 | android:layout_width="match_parent" |
05 | android:layout_height="match_parent" |
06 | android:orientation="vertical" |
07 | android:background="#00ffff"> |
08 |
09 | <TextView |
10 | android:id="@+id/textView1" |
11 | android:layout_width="match_parent" |
12 | android:layout_height="match_parent" |
13 | android:layout_weight="1" |
14 | android:text="This is fragment No.1" |
15 | android:textStyle="bold" /> |
16 |
17 | </LinearLayout> |
With the same way, we are going to make the layout for the second fragment.
Right click on
res/layout folder → New → Android XML File and specify the name of the xml file (fragment_two as we mentioned above). Choose the LinearLayout as root element and then press Finish.
Open the
res/layout/frament_two.xml file on the respective xml tab and paste the following code.
fragment_two.xml:
01 | <?xml version="1.0" encoding="utf-8"?> |
02 | <LinearLayout |
03 | xmlns:android="http://schemas.android.com/apk/res/android" |
04 | android:layout_width="match_parent" |
05 | android:layout_height="match_parent" |
06 | android:orientation="vertical" |
07 | android:background="#ffff00"> |
08 |
09 | <TextView |
10 | android:id="@+id/textView2" |
11 | android:layout_width="match_parent" |
12 | android:layout_height="match_parent" |
13 | android:text="This is fragment No.2" |
14 | android:textStyle="bold" /> |
15 |
16 | </LinearLayout> |
5. Code the Main Activity
In our example, we show the two buttons on the screen and when the appropriate button is pressed, the respective fragment is displayed. By default, the layout of
FragmentOne is shown, as we declared it in the activity_main.xml file at the android:nameattribute of the <fragment> element.
Open
src/com.javacodegeeks.android.filtertstest/MainActivity.java and paste the following code.
MainActivity.java:
01 | package com.javacodegeeks.android.fragmentstest; |
02 |
03 | import android.os.Bundle; |
04 | import android.view.View; |
05 | import android.app.Activity; |
06 | import android.app.Fragment; |
07 | import android.app.FragmentManager; |
08 | import android.app.FragmentTransaction; |
09 |
10 |
11 | public class MainActivity extends Activity { |
12 |
13 | @Override |
14 | protected void onCreate(Bundle savedInstanceState) { |
15 | super.onCreate(savedInstanceState); |
16 |
17 | setContentView(R.layout.activity_main); |
18 | } |
19 | |
20 | public void selectFrag(View view) { |
21 | Fragment fr; |
22 | |
23 | if(view == findViewById(R.id.button2)) { |
24 | fr = new FragmentTwo(); |
25 | |
26 | }else { |
27 | fr = new FragmentOne(); |
28 | } |
29 | |
30 | FragmentManager fm = getFragmentManager(); |
31 | FragmentTransaction fragmentTransaction = fm.beginTransaction(); |
32 | fragmentTransaction.replace(R.id.fragment_place, fr); |
33 | fragmentTransaction.commit(); |
34 | |
35 | } |
36 | |
37 | } |
When our activity is running, we can add or replace fragments. For this reason we use
FragmentTransaction and we should make a commit after a change, in order to be effective.
In our example, we replace the fragment that is in use, with the one that the user “chooses” by pressing the appropriate button. Notice that the
containerViewId of replace method, is the unique id of the <fragment> element in the activity_main layout.6. Run the application
Now we are ready to run our application. To do this, right click on our project → Run as → Android Application. The AVD will appear with the app loaded.
As we can see from the image below, there are two
Buttons and FragmentOne is displayed. As we already mentioned, that is happening because we put the FragmentOne Class at the android:name attribute in the activity_main.xml file.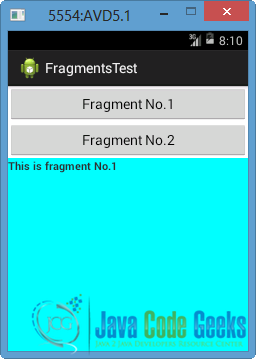
If we press the button
Fragment No.2, FragmentTwo will replace the previous one, as you can see in the following picture.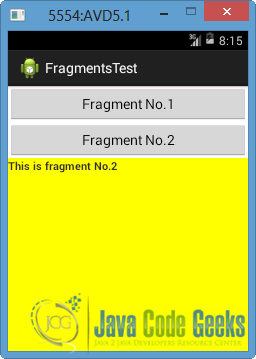
If we press the button
Fragment No.1, the FragmentOne will return a View which is placed in the <fragment> element of the layout. So the appearing screen seems like the first picture.


No comments :
Post a Comment